Appearance
Vitepress
本教程适用于 Linux 系统以及 MacOS 系统,Windows 系统下,需要使用其他方式安装相关的库(nvm)
1. 安装需要的库
1.1 安装nvm
nvm可以管理不同版本的 node,并且可以在不同项目中切换使用不同的node
bash# 安装命令: # 执行后会下载并自动安装,重启终端即可使用 curl -o- https://raw.githubusercontent.com/nvm-sh/nvm/v0.40.0/install.sh | bashnvm简单使用
bash# 查看版本 nvm -v # 查看可用 nodeJs 版本 nvm ls-remote # 安装特定版本nodeJs nvm install 18.17.0 # or nvm install 20 # 安装最新的LTS版本(长期支持版本) nvm install --lts # 查看已经安装的nodeJs版本 nvm list # 设置默认版本 nvm alias default 20.17.0 # or nvm alias default 20
1.2 安装nodeJs
使用 nvm 安装 nodejs 的 LTS 版本:20.17.0
bash# 安装 nodejs nvm install 20 # or nvm install 20.17.0 # 设置使用 20 版本的 node nvm use 20 # or nvm use 20.17.0
2. 初始化项目
(推荐)先从 github 新建一个仓库,如需使用 github pages 建立静态网页,需要将库的访问设置为 pbulic,推荐建立 readme 文件以及.gitignore 文件,建立仓库后,拉取到本地,然后在本地执行后续操作。本操作不在文档中赘述。
2.1 在项目中安装 vitepress
进入项目文件,然后安装开发依赖:vitepress
bash# 在项目文件夹下,安装开发依赖 vitepress npm add -D vitepress初始化项目:
bash# 初始化vitepress 项目 npx vitepress init- 初始化时需要对项目进行配置:
- ①:设置项目位置,直接回车即可,会在当前项目文件夹下建立
- ②:站点标题:可直接设置,或在后面建立的配置文件中修改
- ③:站点描述:可直接设置,或在后面建立的配置文件中修改
- ④:主题:可以选择使用默认主题(推荐),如果掌握前端开发知识,需要对默认主题进行修改,可以选择
Defatult Theme + Customization - ⑤:是否使用 typescript,根据需要选择
- ⑥:是否添加 npm 命令到 package.json 文件中,建议添加
- 初始化时需要对项目进行配置:
2.2 启动vitepress项目
2.2.1 启动项目、修改启动命令(可选)
在安装vitepress 并初始化 vitepress 项目后,就可以启动 vitepress 项目并查看默认的页面了
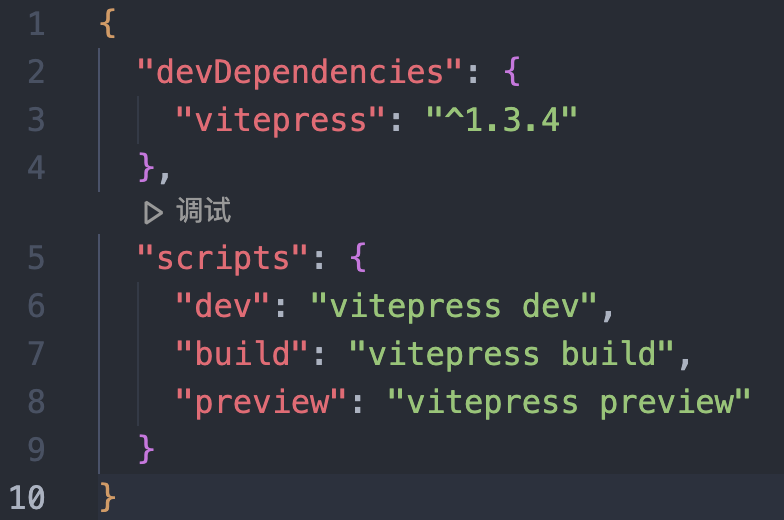
bash# 启动项目 npm run docs:dev如需修改启动命令,可以在
package.json文件中修改:
3. 自定义配置
修改
.vitepress/config.mjs文件,可以进行自定义配置
3.1 修改网页标签栏图标,网页标题,网页描述:
javascript
import { defineConfig } from 'vitepress'

// https://vitepress.dev/reference/site-config
export default defineConfig({
  // base: '/power-notes/',

	// 网页标签栏图标
  head: [["link", { rel: "icon", href: "icons/book.svg" }]],
  // 网页标题
  title: "",
  // 网页描述
  description: "",
})
3.2 添加footer:
import { defineConfig } from 'vitepress'
// https://vitepress.dev/reference/site-config

export default defineConfig({
  themeConfig: {
      // 设置 footer:在themeConfig: {}中进行配置
      footer: {
        message: '千里之行,始于足下',
      },
  },
})
3.3 配置导航栏(右侧文章导航):
javascript
import { defineConfig } from 'vitepress'
// https://vitepress.dev/reference/site-config

export default defineConfig({
  themeConfig: {
    // 配置目录:
    // 可以指向单个文件:连接到相应页面
    // 也可以是一个对象,对象内包含相应的元素:下拉列表,列表元素连接到相应页面
    nav: [
      { text: 'Home', link: '/' },
      {
        text: 'Examples',
        items: [
          { text: "python", link: "/notes/testfiles/markdown-examples" },
          { text: "javascript", link: "/notes/testfiles/markdown-examples1" },
        ]
      },
      {
        text: 'Examples2', link: '/notes/testfiles/markdown-examples2'
      }
    ],
  },
})
3.4 配置社交媒体链接:
javascript
import { defineConfig } from 'vitepress'
// https://vitepress.dev/reference/site-config

export default defineConfig({
  themeConfig: {
    socialLinks: [
      // 部分图标(如 github)自带,使用非自带图标时,需要指定对应路径
      { icon: 'github', link: 'https://github.com/vuejs/vitepress' }
    ],
  },
})
3.5 配置搜索框:
javascript
import { defineConfig } from 'vitepress'
// https://vitepress.dev/reference/site-config

export default defineConfig({
  themeConfig: {
    search: {
      provider: "local",
      // 以下内容可以注释掉,
      // translations内可以对显示的提示文本进行翻译
      options: {
        translations: {
          button: {
            buttonText: "Search Documents",
            buttonAriaLabel: "Search",
          },
          modal: {
            noResultsText: "No Results",
            resetButtonTitle: "Clear Conditions",
            footer: {
              selectText: "select",
              navigateText: "Toggle",
            },
          },
        },
      },
    },
  },
})
3.6 配置侧边栏
- 两栏:左侧显示文章目录
javascript
export default defineConfig({
  themeConfig: {
    sidebar: false,
    aside: 'left',
  },
})- 三栏:左侧栏不显示内容
javascript
export default defineConfig({
  themeConfig: {
    sidebar: [
      {
        // 如需配置内容,取消下面配置的注释,根据自己的项目进行配置
        // text: 'Examples',
        // items: [
        //   { text: 'Markdown Examples', link: '/markdown-examples' },
        //   { text: 'Runtime API Examples', link: '/api-examples' }
        // ]
      }
    ],
  },
})
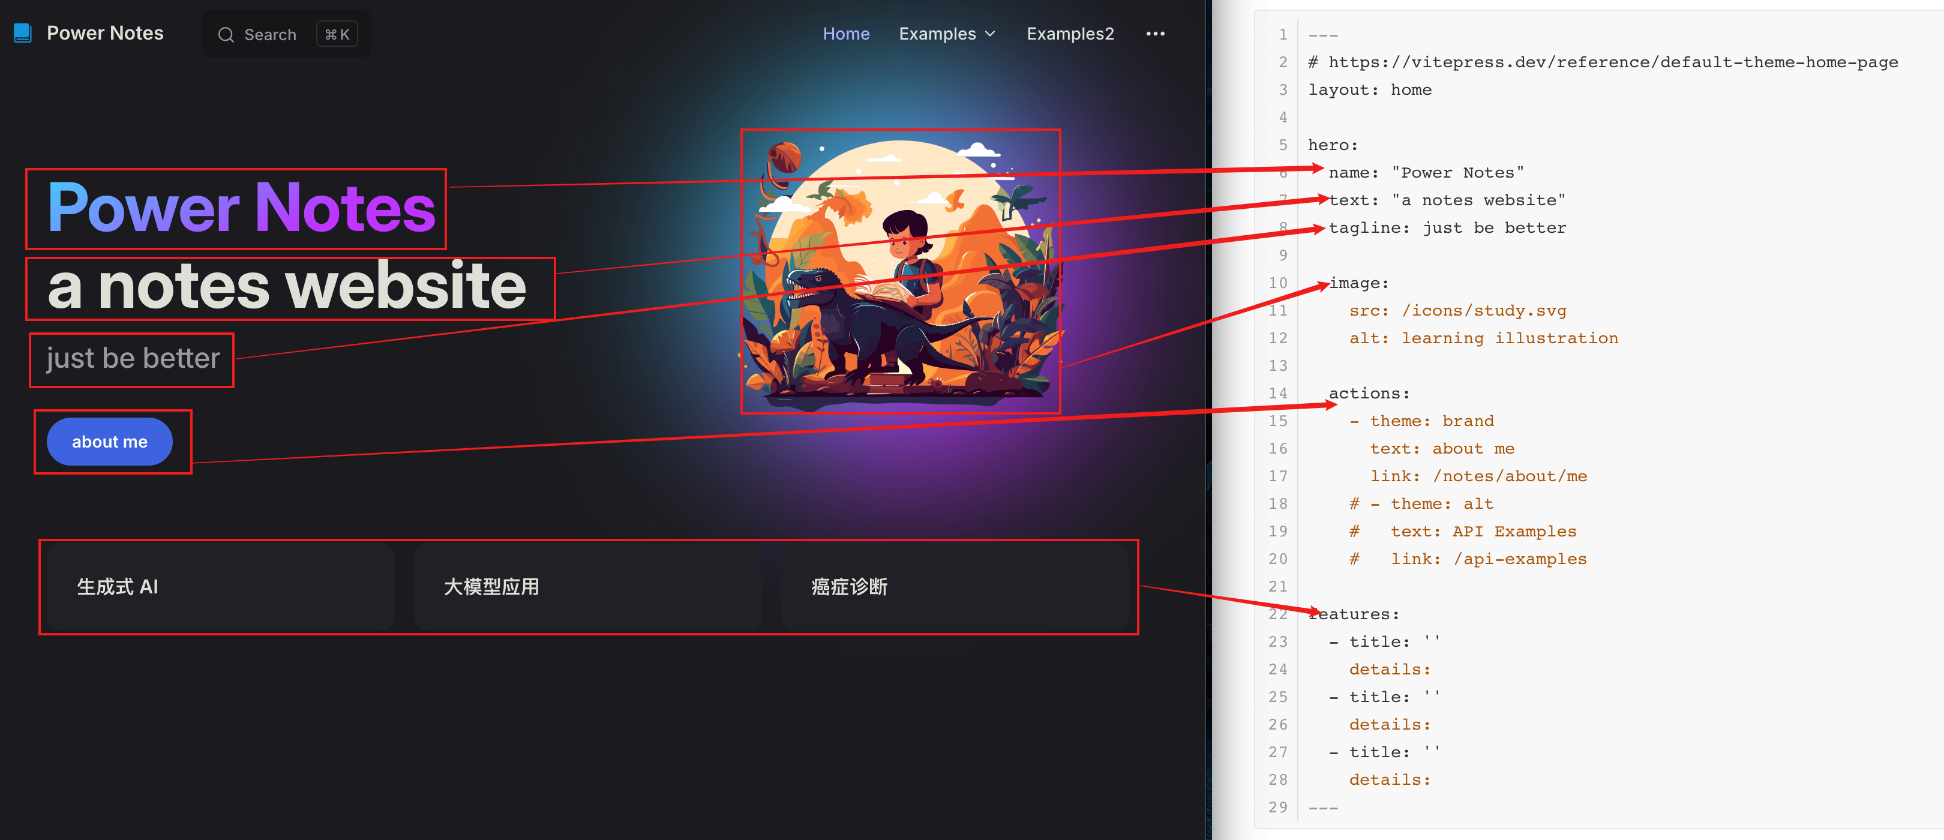
3.7 设置 home 页面内容区域内容:
编辑 index.md 文件
markdown
---
# https://vitepress.dev/reference/default-theme-home-page
layout: home

hero:
  name: "Power Notes"
  text: "a notes website"
  tagline: just be better

  image:
    src: /icons/study.svg
    alt: learning illustration

  actions:
    - theme: brand
      text: about me
      link: /notes/about/me
    # - theme: alt
    #   text: API Examples
    #   link: /api-examples

features:
  - title: ''
    details:
  - title: ''
    details:
  - title: ''
    details:
---
对应关系如下:

3.7 base 路径设置:
- 如果托管到 github pages,则需要将 base 设置仓库名称
- 如果需要在 github pages 使用自定义域名,则不要设置 base 路径
4. 自动部署
4.1 部署命令
可以使用如下脚本进行自动部署:
yaml# 构建 VitePress 站点并将其部署到 GitHub Pages name: Deploy VitePress site to Pages on: # 在针对 `main` 分支的推送上运行。如果你 # 使用 `master` 分支作为默认分支,请将其更改为 `master` push: branches: [main] # 允许你从 Actions 选项卡手动运行此工作流程 workflow_dispatch: # 设置 GITHUB_TOKEN 的权限,以允许部署到 GitHub Pages permissions: contents: read pages: write id-token: write # 只允许同时进行一次部署,跳过正在运行和最新队列之间的运行队列 # 但是,不要取消正在进行的运行,因为我们希望允许这些生产部署完成 concurrency: group: pages cancel-in-progress: false jobs: # 构建工作 build: runs-on: ubuntu-latest steps: - name: Checkout uses: actions/checkout@v4 with: fetch-depth: 0 # 如果未启用 lastUpdated,则不需要 # - uses: pnpm/action-setup@v3 # 如果使用 pnpm,请取消注释 # - uses: oven-sh/setup-bun@v1 # 如果使用 Bun,请取消注释 - name: Setup Node uses: actions/setup-node@v4 with: node-version: 20 cache: npm # 或 pnpm / yarn - name: Setup Pages uses: actions/configure-pages@v4 - name: Install dependencies run: npm ci # 或 pnpm install / yarn install / bun install - name: Build with VitePress # 替换为你自己的build 命令 run: npm run build - name: Upload artifact uses: actions/upload-pages-artifact@v3 with: path: .vitepress/dist # 部署工作 deploy: environment: name: github-pages url: ${{ steps.deployment.outputs.page_url }} needs: build runs-on: ubuntu-latest name: Deploy steps: - name: Deploy to GitHub Pages id: deployment uses: actions/deploy-pages@v4
4.2 在 github 中设置自动部署
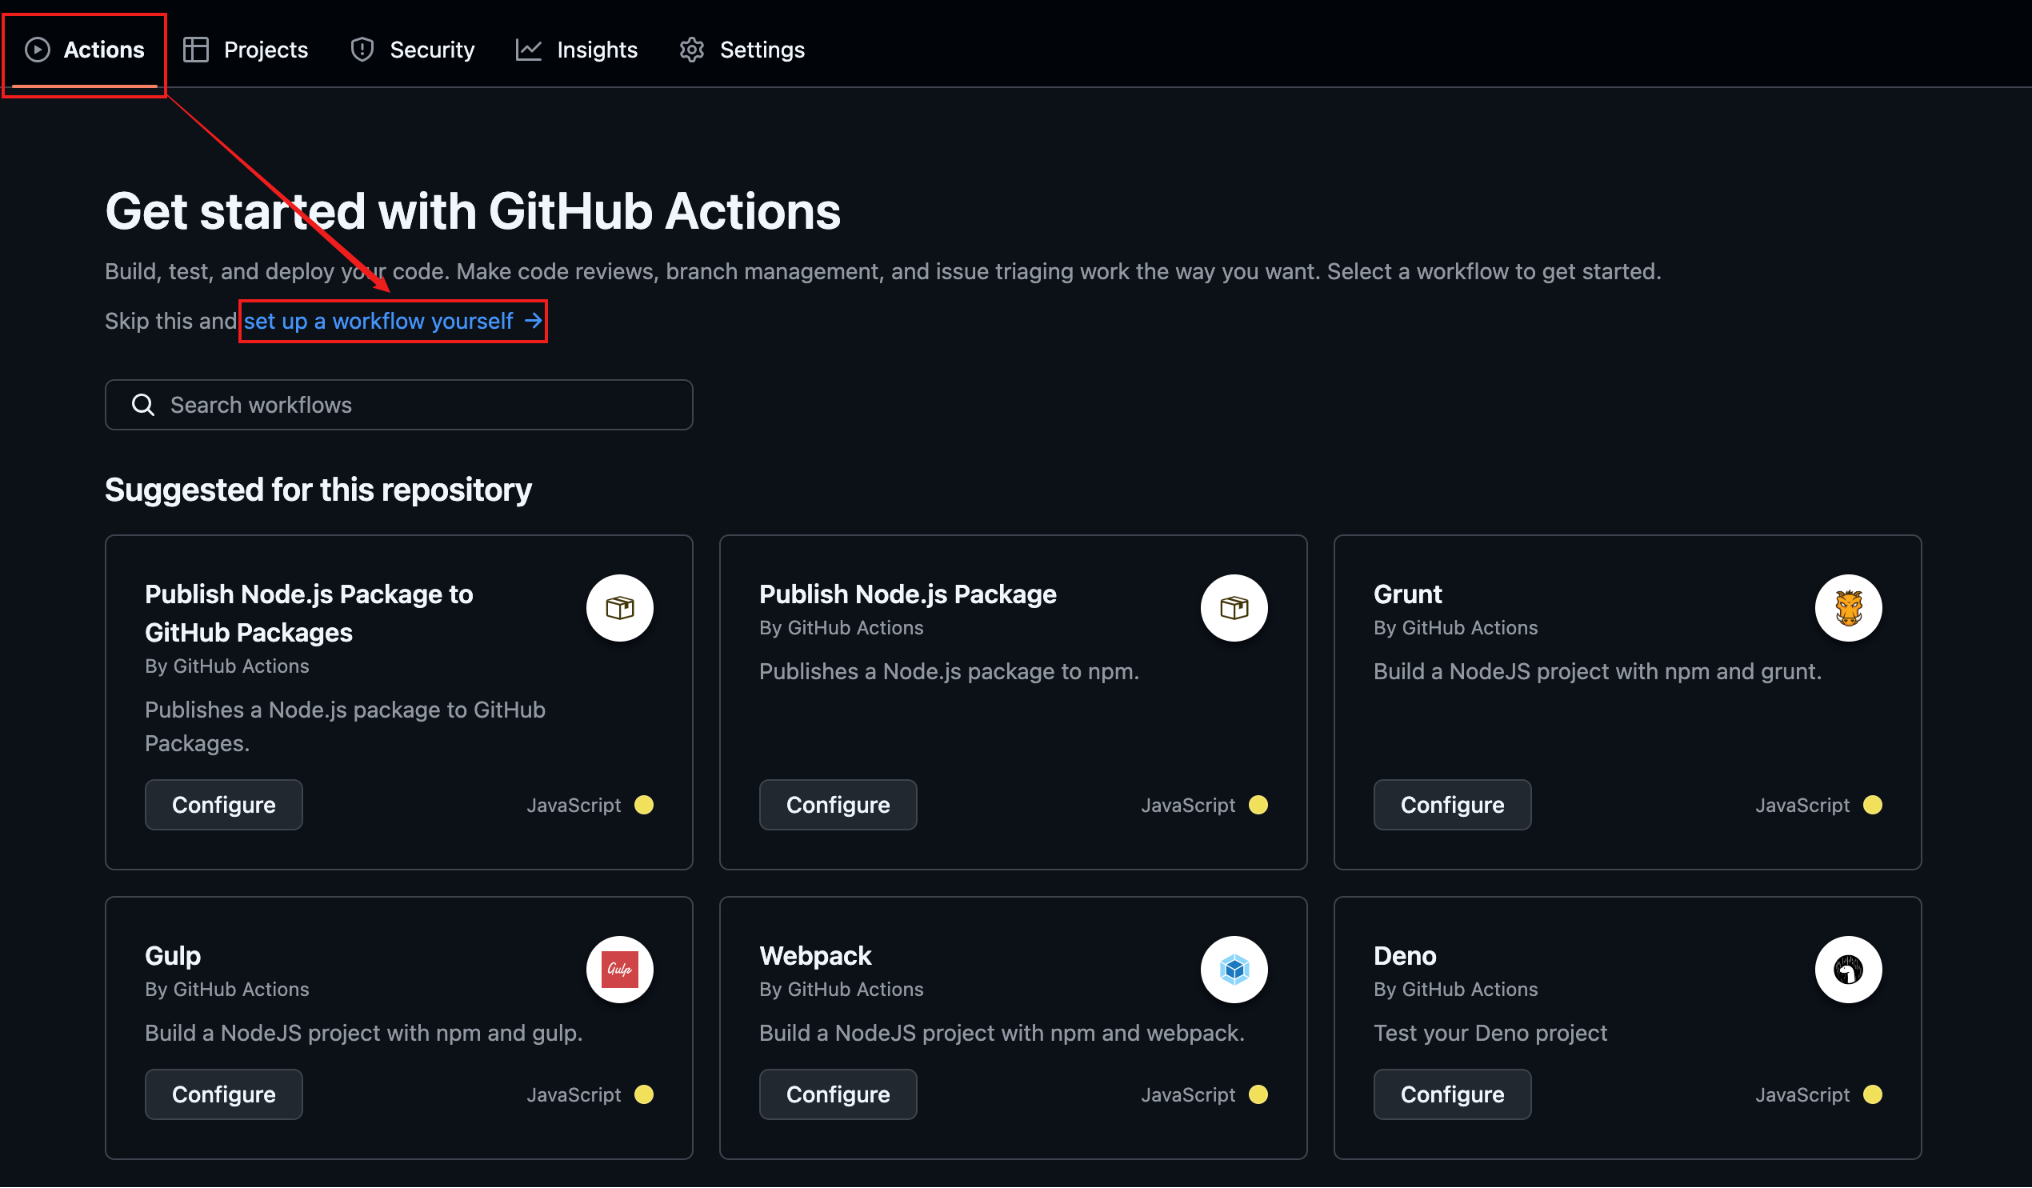
- 将上述脚本添加到 github的 Actions 中:

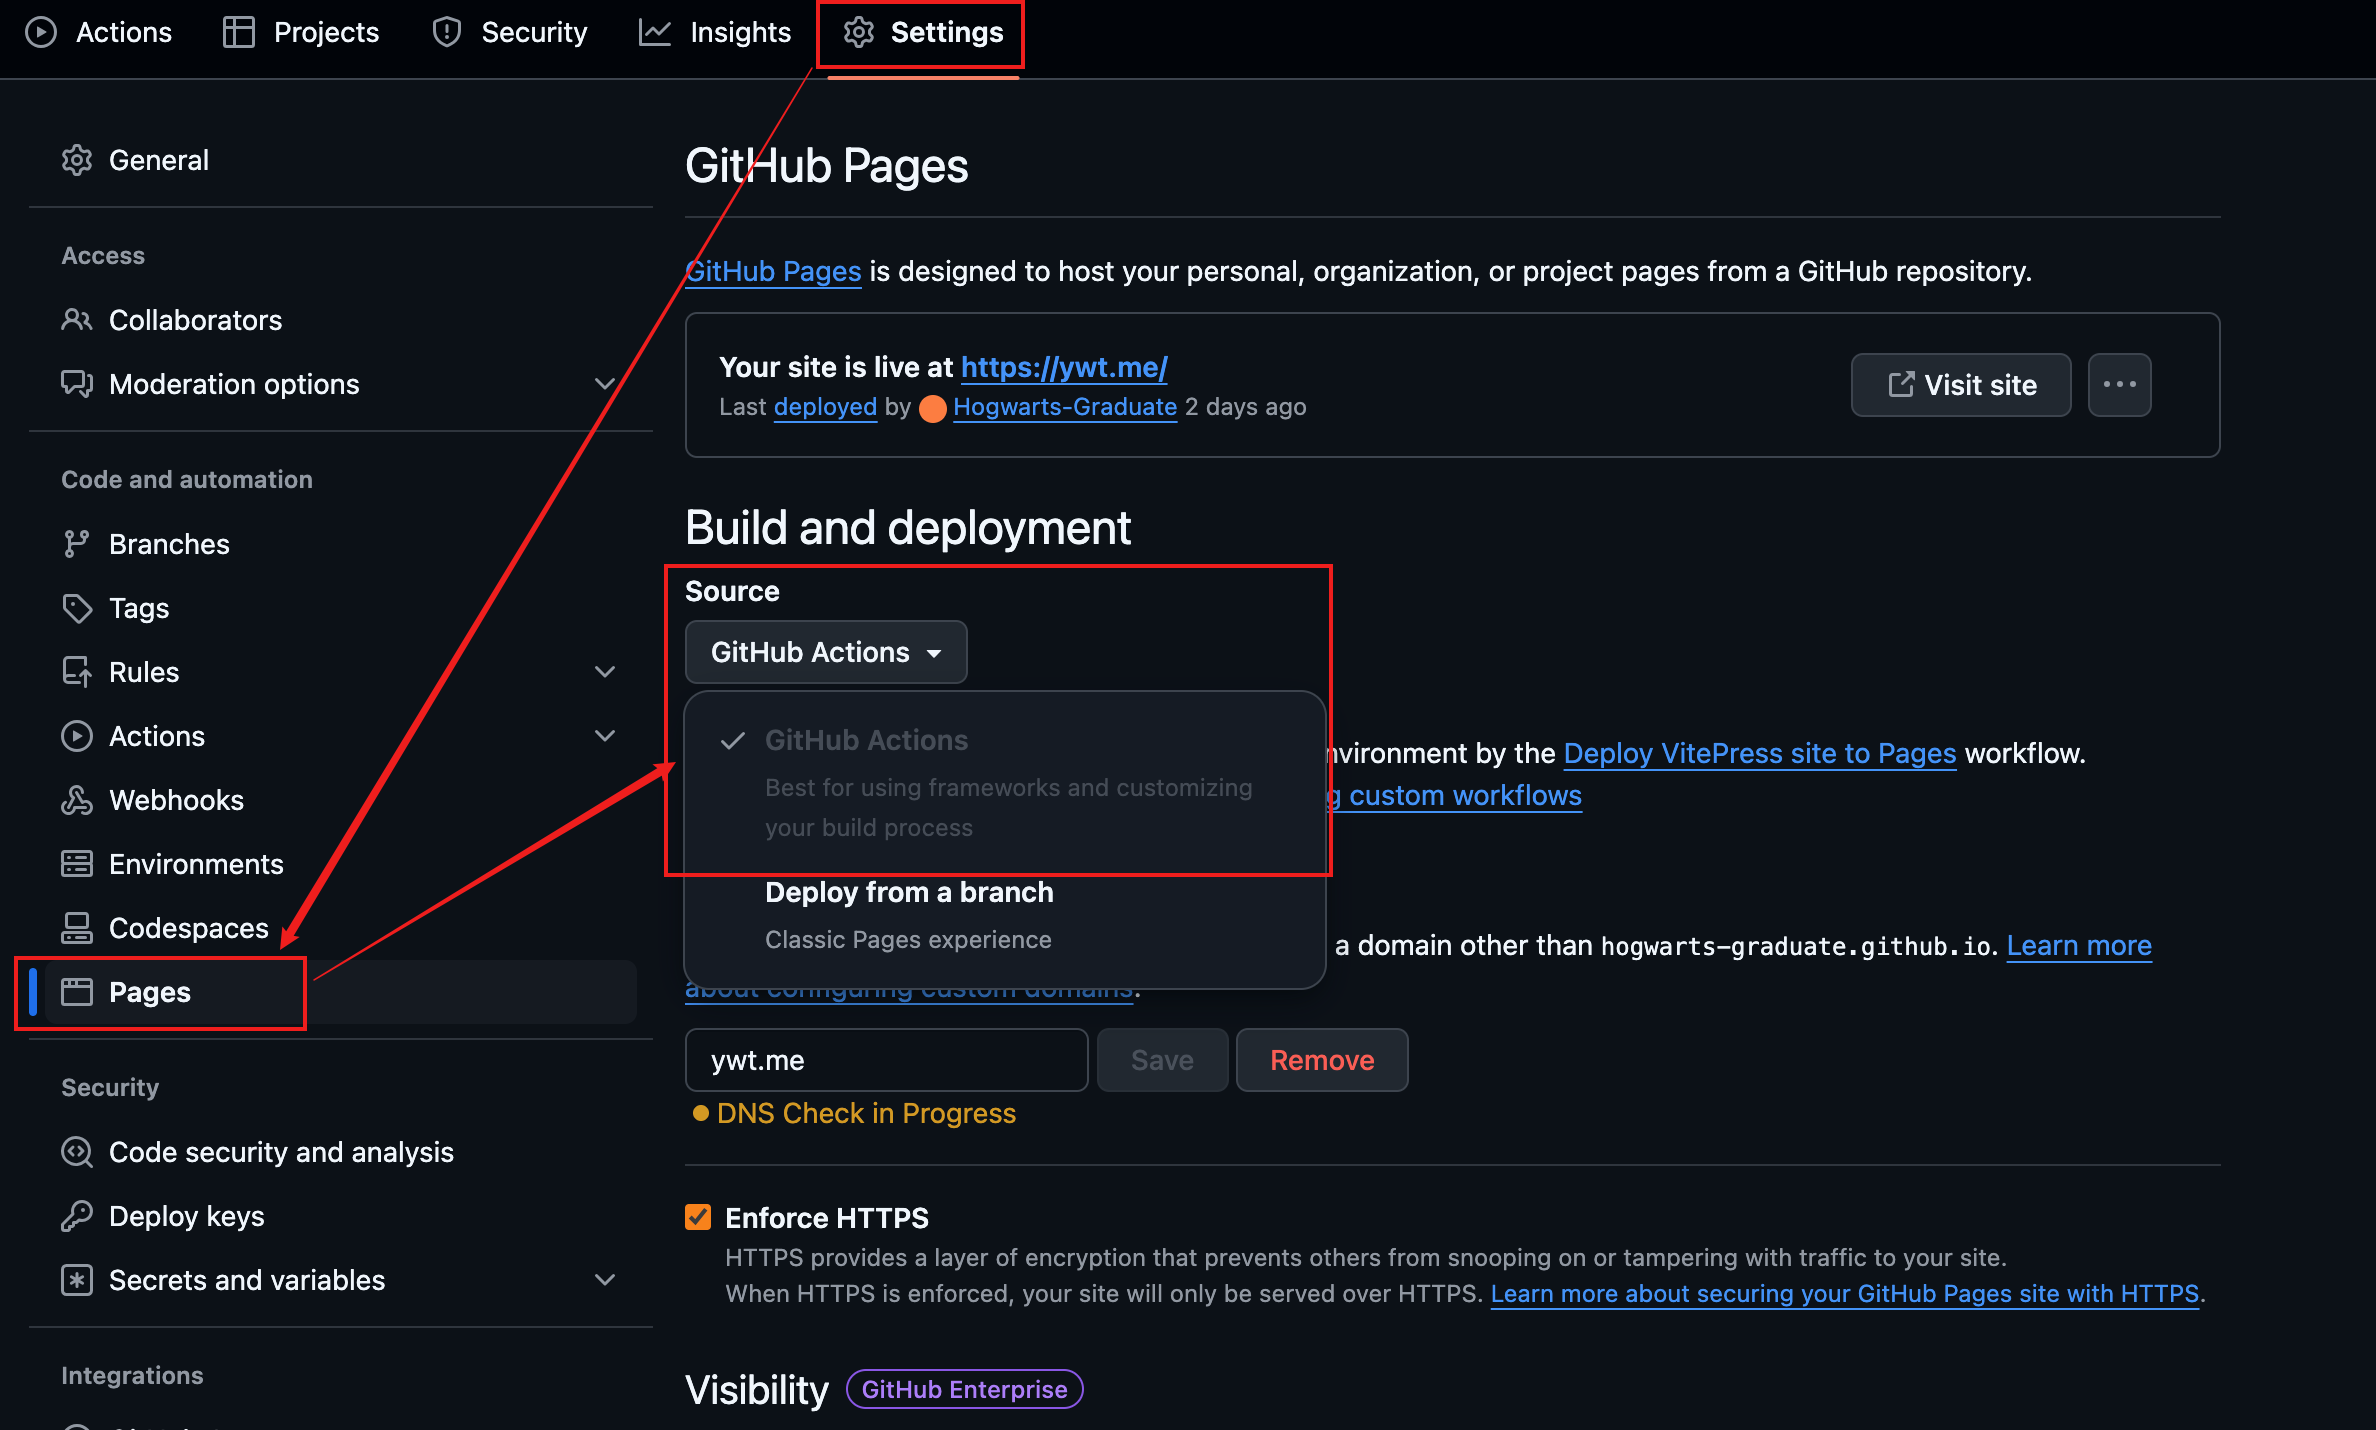
4.3 GitHub pages中设置部署
